Archive for April 11th, 2011

How to find out Ubuntu system information

There are a few ways to figure out which version of Ubuntu and kernel you are using.

First, lets try GUI. Just go to System > About Ubuntu. It will shows you a lot of information, including the version you are using.

You can use the Terminal to find out more. Open it up and type:

uname -a

It will print all the information, -a stands for all. You can try other flags, such as -r, -o or -v.

uname -r

will show only the kernel information

uname -o

shows only your operating system, and

uname -v

displays the version of your kernel.


There are other ways to find the version of your linux. Type:

lsb_release -a

-a shows all information once again. You can alternatively use:

cat /etc/lsb-release

or try

cat /etc/issue


Don’t you just feel better now, knowing more about what exactly is under the hood of your PC case? 🙂

How to check disk space in Ubuntu

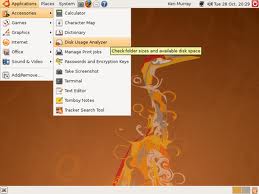
Ubuntu Disk Usage Analyzer

Ubuntu Disk Usage Analyzer

There are quite a few ways to check the hard drive disk space in Ubuntu. Lets look at the most popular ones.

1) Using GUI in Gnome – Just go to Applications > Accessories > Disk Usage Analyzer. Open it and it will show you used and free disk space. Easy, huh? Well, here is what else you can do – click filesystem scan and it will show you the usage of each individual directory and display it in a pretty graph.

2) Using command line. Now this is where it gets fun. There quite a few ways to check the disk space using the Terminal. One of the most popular is:

df

Now df by itself as you can see is confusing. Let’s try it with a flag:

df -h

A lot better, huh? -h flag stands for human readable format.

There are a lot of other tools you can add to make the command line look prettier and more user friendly. One such tool is discus (disc usage). Type:

sudo apt-get install discus

After installation you can just type in:

discus

and it will show you the stats in very friendly format. It is configurable, so check out

man discus


We can also use du command (disc usage) to show the size of the current directories. Type in Terminal:

du

and it will show you not too friendly output, try again using some flags

du -sh *

or

du -s -m *

-s stands for summary, -m to show it in megabytes, or you can once again use -h for human readable.


Check total free space in the system – use free CLI command. Open terminal and just type:

free

or

free -m

Once again, -m flag to show it in a nice format in Mb.


Do you need it to take one step further and check the CPU load and Memory Usage?

Use top command. Type in Terminal:

top

as you can see, it shows you the computer load and usage in real time. You can sort it while watching by pressing m key by memory, l by load, t by process time.


This is about it. You should now know how to check you system status, free and used space, cpu and memory usage.

It takes time to memorize these commands, but once you do it will be easy. Just remember that each command in Ubuntu is well documented and you can also do

man <command>

or try

<command> --help

to refresh the memory.

How to add a new user in Ubuntu

You create your first user during the initial Ubuntu installation. This user has special privileges, such as create new users and performing a lot of administrative tasks. There is also a root user account which is the main administrative account and has pretty much all the priveleges the user can get. Now we can get a lower level of user with just basic privileges.

Adding new user in Ubuntu is pretty easy. There are two ways – using GUI and Terminal CLI.


Lets take a look at GUI first (just in case, GUI stands for Graphical User Interface). Go to System > Administration and  pick Users and Groups menu option, it will prompt you for your main user password.

You are now in Users and Groups section. Now click “Add User”. Check out the “Advanced” options and “User Privileges”. Obviously, you would want to modify some privileges, such as “Connect to Internet”. Now press OK, get back to the previous screen that now lists the new user and press OK again. You have just created a new user and the new home folder for the user.

Try playing around in Users and Groups section. Create new groups and try placing users into different ones. This would allow users to share their files and folders, and you can set permissions on other folders in the system (will need to make another post on this) to use by certain groups.


Now lets create a user using a terminal window, open a Terminal and type:

sudo adduser newuser

or

sudo useradd -d /home/newuser -m newuser

where -d flag helps creating the home directory for the user and -m forces the directory creation. You can also specify the password right away with useradd function by using -p flag and typing password after it.

Also, you can just specify the password for the newuser as:

sudo passwd newuser

These commands are almost identical but adduser is a bit easier because it will prompt you for every piece of information after you press enter. Try it out.