Author Archive

Turn off system beep in Ubuntu

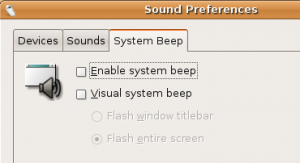
System Beep

System Beep

System beeps are annoying. Not only the sound is bad but it doesn’t even come from the speaker, instead it comes from the midi on your computer board. It can get very annoying every time it goes off in a quiet place like library. Even at home, when you are just trying to concentrate. Anyway, it is easy to turn it off.


The easiest solution is probably:

Go to System > Preferences > Sound > System Beep tab. Just uncheck the box and the beep is a history.


You can enable the visual beep if you want. I wish Ubuntu would make it more configurable so I can just pick my own sound or at least make the default one less loud and annoying. After all these system beeps do come up quite often and depending on your computer it can easily wake your neighbors up.

Some cases when system beep comes up include:

1) Typing the wrong login and trying to get into the system, which happens quite a bit when I get on pc at night in a dark.

2) No auto-complete option when you type something in the Terminal window. Happens quite a bit, especially navigating through the directory structure.

3) Searching for something in Firefox when there are no results. Comes up a lot when I try look up a position of the website in google for instance.

etc. When does it frustrate you the most? 🙂

I searched online a little bit about this issue and seems that there are many many users complaining about it… I hope that this is something that will be fixed in the future updates. After all, I’d like to have the beep, just want the sound to be more pleasant and from the regular speakers. Also, seems that people didn’t have an easy option to disable it in the older versions or prefer to use different methods. If you have an older version or just like experimenting, you can try these solutions as well:

1) Temporary disabling via user preference utility in terminal, type:

xset b off

xset b 0 0 0

2) For the terminal – Edit > Current Profile > General > Uncheck “Terminal Bell”

3) Set bell frequency to 0 in terminal type:

setterm -bfreq 0

4) Blacklist the pc speaker driver. In terminal type:

sudo sh -c “echo blacklist pcspkr >> /etc/modprobe.d/blacklist”

or just go to /etc/modprobe.d/blacklist and manually add a line at the end: “blacklist pcspkr”

Please note, that some Ubuntu versions have /etc/modprobe.d/blacklist.conf

5) Remove the driver. In terminal type:

sudo modprobe -r pcspkr

to re-enable the driver you’ll have to type:

sudo modprobe pcspkr

6) Removing the module, which is pretty much the same, in terminal type:

sudo rmmod pcspkr

If you want it back, just type the same command:

sudo modprobe pcspkr

I hope this helped you and you can now enjoy your peaceful and quiet evenings.

Please let us know if it helped you and if you have tried any other solutions.
How to open a Terminal window in Ubuntu

Ubuntu Terminal Window

Ubuntu Terminal Window

This one is simple, but many starting Linux users find terminal windows extremely overwhelming. It is true, even in Ubuntu you WILL have to use terminal at some point. It is similar to Windows Command Prompt window but is more vital part in the OS. 🙂

It is usually a lot faster to get something done using Command Line Interface (CLI), but you need some experience before you get better at it. So, here is how you start a Terminal window in Ubuntu:

Applications menu > Accessories > Terminal.

Now lets configure a terminal shortcut keys. Go to:

System > Preferences > Keyboard Shortcuts.

It is also pretty convenient to open/switch between terminal windows by pressing Ctrl + Alt + F1 through F6. F7 will hide the Terminal windows and get you back to the desktop.

These are the simple ways to open the terminal window in Ubuntu and do simple navigation between the ones you have. We will have a look at common functions and describe some useful terminal commands in the future posts.

Edit: I broke my ubuntu today and almost lost hope as ALT+F# buttons did not work. I was able to get the terminal window using this shortcut:

Ctrl+Alt+T

How to run Windows In Ubuntu – Installing VirtualBox

XP Virtual Box In Ubuntu

Windows XP Virtual Box In Ubuntu

VirtualBox gives you the ability to run another operating system inside of your already existing operating system.  First, you can download a copy here, but it is not needed as you can install it using synaptic package manager. VitualBox is very convenient. As stated before – it does run an OS inside of another OS, so make sure you got a bit of RAM for two systems. However, unlike with dual-boot system, you would not have to reboot the computer every time you need to use a different OS. You can also enjoy the convenience of easily running the applications that you can’t live without and completely give up one system over another. VirtualBox is just an easier way to have it, however, if you like to run Windows applications in Ubuntu, check out Wine project (a bit more complicated, more on it later).

Anyways, have a Windows CD handy and logged in to your Ubuntu, let’s start. Go to System > Administration and look for “virtualbox-ose”. Install the package. Next, use a terminal window to add yourself to vboxusers group. Type:

sudo adduser $USER vboxusers

or simply type in your username instead of $USER.

Next step is to enable USB support for your VirtualBox. Open terminal window once again and type:

sudo gedit /etc/init.d/mountdevsubfs.sh

This would open an editor to edit the file. Now find the section that says:

#
# Magic to make /proc/bus/usb work
#

Make sure that these lines are uncommented (no  ‘#’ at the beginning), if they are, uncomment them (remove the starting ‘#’ sign). These 5 lines are starting with:

mkdir
obusmode
domount usbfs
ln -s .usbfs
mount

Save the file and reboot.

Now it is time to launch the VirtualBox. Go to Applications > System Tools > Innotek VirtualBox and click “New” as we are creating the new box. Now select OS Type you are trying to install – such as Windows XP and name the box. Select the memory you want to dedicate to the box and how to share the hard drive. Make sure you have enough disk space… a few gigs will do. 🙂

Time to install Windows. Put in your CD and go through the “settings”. Make sure you have some options such as “Mount CD/DVD Drive” for it to work, but also go through additional settings to set up your network and such. Click Next and Windows will start installing.

Once the install is complete – you should have a Windows VirtualBox. I would recommend going to “Devices > Install Guest Additions” next. This option will give you a lot more flexibility, such as running in full screen mode, seamless mode, share the folders and copy cut from one system into another. Pretty cool stuff.  Now restart again and log into to your new VirtaulBox. Play around, check out Full Screen Mode by pressing Host Key, usually right ctrl unless you changed it, together with “F”. Also, check out Seamless Mode by pressing Host Key with “L”. To get out of the mode, just repeat the key combos.

You now have a system within a system. Good work. 🙂

How to install Ubuntu

Ubuntu Installation

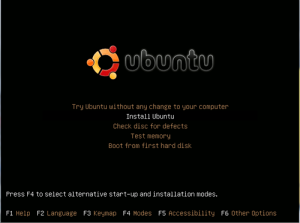
Ubuntu Installation Screen

Installing Ubuntu is easy. First, make sure you have a copy of Ubuntu (look through my recent post – How to Burn Ubuntu Disk if you have to). Second, decide whether you want it to have on the same machine as your other OS. Yes, you can have Windows and Ubuntu on the same computer.

Now lets start. If you have a disk, you have two options:

1 (easy) – install it from your Windows. Start your computer and insert the Ubuntu disk into the drive. It should open up a screen with installation options. Now this option is good if you are just going to use Ubuntu as a secondary system. You can later even remove it via add/remove Windows options. The bad thing is that it will affect the performance as it will be using Windows file system. Now the Wubi installation will guide you through the process. It is as easy or even easier than installing Windows, just pick your settings, username, password, etc. It will then download the required files for selected configuration and you will have a dual boot computer. Just restart the Windows and you can pick which OS you want to load on every reboot.

2 – Regular Installation. I prefer this method. I still use Windows, but I have a second pc and a virtual box (if you are not sure what it is, it’s like an operating system inside of an operating system… more on this later) with Windows. Anyway, its time to start. Start Windows, plug in disk and wait for the install screen to pop up. You can also install it by enabling the bios to boot from CD and start your computer with the CD in the drive. “Demo and Installation” option is the one you need.  Make sure you have enough disk space, I’d say around 5Gb at least. You should get to the screen with the desktop and actual Ubuntu, however, it is only a demo. To install, click “Install” on the desktop. It will guide you through a few simple steps, such as selecting language, picking user name and password, selecting partition and some others… Selecting partition is probably the most confusing part. If Ubuntu is the only OS you will have, you can use the entire disk. If not, just use the largest continuous space. Keep on going through the easy configuration screens and click “forward” until you see “install” button. Here you can review the settings before clicking it.  Once complete, remove the CD from the drive and restart your computer.

Ta-da! Doesn’t get much easier than that! 🙂 Now just login using the credentials entered during installation and enjoy the new system!

Please let me know if you have any questions or comments…

How To Burn Ubuntu Disc

Maverick Meerkat Disc

Maverick Meerkat Disc

After showing off Ubuntu a few people asked me where they can get Ubuntu and how much it is. Next time I will just send them to this post instead. 🙂

Ubuntu is freely available on the web in the .iso format. You can download a desktop/laptop edition here. After download is complete, you can burn it on the disk. Regular 700 mb CD would work but if you want to have it on DVD, its ok too . Here are the instructions:

If you use Windows 7, it comes with built in support to burn ISO files. Just right click the newly downloaded file and click “Burn disk image”.

For older versions of Windows you can use CD burning software that has an ability to burn image files, ISO in this case… I prefer nero which comes with free trial if you want to give it a shot. Just pick a menu option to burn an image and find the Ubuntu file that you have just downloaded.

Newer Macs also have an option to burn an image file, just use the disk utility or disk copy, depending on your OS.

If you already use Ubuntu and just trying to get the newer version, it also has a built in support to burn ISOs. Use CD/DVD Creator and burn it as a file image.

Upon completion you should have a bootable Ubuntu disk.

If you don’t want to waste a disk, you can also install Ubuntu from a flash drive. However, if you decide to make bootable disk out of ISO, make sure you burn it as an image. You cannot just drag and drop the file and burn it as data.

Amazing Ubuntu Avatars

Ubuntu Avatar

Ubuntu Avatar

If you are a hardcore Ubuntu user, you are probably very proud of it. Most of the people I met who use Linux love to show off their systems. Their desktops scream “Check how hot I am” with sexy and geeky wallpapers, useful plug-ins, nicely organized icons and custom color schemes. These people talk about Linux non-stop, always eager to learn and share something new and useful.

Everybody have nice wallpapers, however, not everybody use avatars that let other people know what they are into without asking. Avatars are generally used on messengers, forums, social networks and blogs. Perhaps it is time to fire your pidgin and change the image you have been using for years to something newer and more relevant.

Check out these cool Ubuntu avatars, I am pretty sure you would find something that will fit your taste. If not, you can always create an avatar of your own as they have other options, such as creating one from your own image.

Just thought I would share just a few great but not the best ones I found. There are over 100 of them, these are just 6 of my quick picks 🙂

Ubuntu BellyUbuntu ServerUbuntu GlassUbuntu FunUbuntu GirlUbuntu Eye

Ubuntu 10.10 – Maverick Meerkat is out

As you may have heard, the new version of Ubuntu – 10.10, codenamed Maverick Meerkat, is officially out. As a matter of fact this 10.10 version was out on 10.10.10 at 10:10:10. 🙂

First, what does it mean for this blog since it is named after an “old” version? Not much. This blog is now a general Ubuntu blog, and I will be still posting things that I find interesting about Ubuntu. Lucid Lynx was sort of an entry point for me and I got a little carried away with some of the projects that I have been working on. Initially, I was planning to post all the issues with Lucid, such as helping resolve various driver problems, etc. but I did not get too much to complain since everything worked great out of the box for me.

Second, lets look at some changes at Maverick Meerkat. 🙂

Ubuntu 10.10 has been optimized a lot for netbooks, I would like to see more Ubuntu powered netbooks hit the market. As an addition it started to support multi-touch screens.

There also have been a lot of changes to the installer, they just can’t leave it along I guess, making it better with every release. You can now download additional packages that you may need during the initial install phase. It also installs quite a bit faster now.

The desktop has been updated to the Gnome 2.32 and by default Ubuntu comes with a new wallpaper. The overall look has been noticeably changed, even the font is new.

The last change that I want to mention is paid apps platform. A lot of users seem to be pretty excited about it as it may open the doors for the development in monetary interest in Ubuntu, but I am not too excited about it since this was the primary reason I switched to Ubuntu, but I don’t complain. As a matter of fact, the whole Software Center got revamped. It has a few additional features.

Here is a new desktop for you:

Disable Hibernation on Ubuntu Laptop

Ubuntu Lucid Lynx puts your laptop into hibernation by default when idle. During hibernation, the content of your RAM gets written to the hard drive on a separate partition before turning off the laptop. This content gets reloaded on the next start up. In order to hibernate, your laptop needs to have enough free space on the hard drive.

In some cases, even when the hard drive space may not be an issue, you may like to decrease the waiting time for the computer to boot up again and would rather have it go into sleep mode rather than hibernation. This is when you may want to change these settings. In order to make it go to the sleep mode when running on battery power, follow these steps:

1) Open the terminal window (ALT+F2)

2) Enter gconf-editor command

3) Once the editor window comes up, go to apps -> gnome-power-manager -> actions

4) You should see two sleep_type options – sleep_type_ac for the power and sleep_type_battery for the battery mode. Now change the value for sleep_type_battery from hibernate to suspend and you are set.

You can also edit the Power Management options under “System” -> “Administration” and specify the time you want to wait before your laptop/pc goes into sleep/hibernation mode.

Ubuntu Baby Rocker

Just came across this video and though it was pretty funny. Oh, things that people can do with Ubuntu sometimes are just unimaginable. 🙂

Compiz on Lucid Lynx and Load Time

I was going to record my own video, but there are already so many out there that I decided to save some time and include the one of many that I found on youtube. Compiz consists of a few packages that you can install, this video shows examples from the standard compizconfig-settings-manager and compiz-fusion-extra-plugins. While compiz is not really new, it is still a lot of fun to play around with. BTW, this was THE reason I installed Ubuntu a few years ago.

Here is a video:

It just looked so cool, but gets old once you play around for a bit. It is still fun to show to the friends when they come over. Especially to Mac-heads since they are always so proud of their apples, which by the way is built on Linux anyway. We would constantly have Windows-Mac arguments with no outcome, however, once they see Ubuntu, they have nothing to say. Viruses – same results, the look and effects – Ubuntu wins, load time – Lucid Lynx is fast here as well, applications – Ubuntu with Wine wins. 🙂 I love the way Linux uses the consoles, allowing to have a few desktops at the same time. It is so convenient, especially when you code and have one desktop for one project. Makes multitasking so much easier. Ubuntu seems a lot faster than anything I have tried so far. Seems like I can get done a lot more, a few seconds faster here, a few there adds up a lot of extra time to put into something useful instead of just waiting for some app or load/reboot. Here is another video I just found on the load time comparison between Lucid Lynx and Windows 7. Even though it is not precise, I still found it pretty useful.

Anyways, there are too many videos on Ubuntu out. Just want to say that Lucid Lynx is perfect for my second pc.

P.S. I found out about compiz after seeing my friend’s pc. He is a hardcore FreeBSD guy and showed me Beryl over 3 years ago. I was really impressed and a few month later I found Ubuntu and Compiz. I am not sure which one came out first, Beryl or Compiz, but they seem to be very close.